Cant say much about this except for I am working on it right now! Looks to be an awesome film
Saturday 12 December 2015
Sunday 18 October 2015
4 years at Rising Sun Pictures!
4 years at Rising Sun Pictures!

Its about this time 4 years ago now I joined the RSP team! Since starting as a junior ive progressed through many departments learning the ropes of feature film production. Im now firmly placed in Look Development and have been a lead artist on 2 major projects! Here's to the next 4 and beyond!
Sunday 7 December 2014
GoPro o Matic 2.0
Download link below
GoPro O Matic v2.0 for Nuke
A new revision to the GoPro_o_matic nuke tool, its now designed to work with the protune "flat" color method in the latest 2.0 firmware upgrade.
New in version 2.0
Removed old color conversion methods
Added Log to Linear
Added Log to Rec709
Added Log to sRGB
Added protune grade match
Added lens distortion models (solved with lens grids)
Added built in sharpening


Example of updated grid based lens solves

The wide model is fairly extreme, I find that medium works will to take the edge off the fisheye effect without damaging the edge of frame too much.
Enjoy! please leave comments / feedback that you may have.
Saturday 21 December 2013
GoPro Omatic for Nuke! Free Download
GoPro Omatic!
a free tool for Nuke that handles color space, distortion and chromatic aberration artifacts.
Using GoPro footage more and more in a professional environment, I made this little tool to help speed up the process of getting gopro footage ready for compositing inside of Nuke.
The first step is to properly prepare your footage for Nuke (you can directly import a cineform codec .avi or .mov but it is very VERY buggy and will crash a whole lot...)
- Convert your gopro footage to the cineform codec using "filmscan 1" if possible
- Be sure NOT to have any LUT applied from GoPro studio, as this will result in 2 LUT's applied.
- You can have sharpening applied inside GoPro Studio if you wish but you will get better results from Nuke's tools.
- Use the CF2DPX.exe to convert your shot to .dpx frames
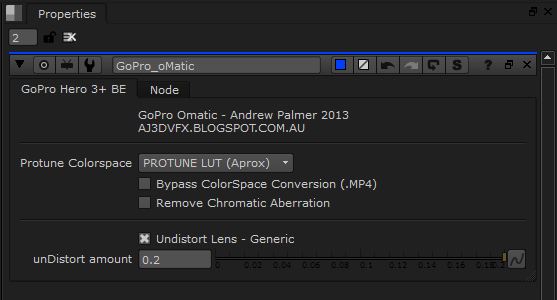
Protune Colorspace
Cineon - Nukes default import
RED Log - This has nice compression/range
2.2 Gamma - Straight conversion
rec709 - straight conversion
Protune Lut (Aprox) This is an approximation of the protune LUT.
Bypass colorspace conversion for (.MP4) - Used for non cineform files or if colorspace LUT was pre-applied
Remove Chromatic Aberration - what is says on the can, automatic removal of edge chroma artifacts.

Undistort Lens - Generic - not based of a lens grid solve (that should be in the next version)

Please feel free to use and share as you wish but do so at your own risk and ect....
Please leave a comment below if you like it or have feedback for bugs or feature suggestions!
Wednesday 20 November 2013
DJI F450 Aerial Video Build!
--DJI F450 Quadcopter--
I already had RC building experience so I didnt find this challenging to build but if you are not confident with a soldering iron, or used to the RC world of controllers and tech jargon - you may want some help. There are loads of videos on youtube and forums filled with people who are willing to help. Patience is key & do it right first time.
You will need
A frame kit of sorts ( DJI, Tarot, HobbyKing )
Motors and Electronic Speed Controllers or "ESC's"
Propellers between 8" to 10" - I recommend the Graupner E-Props 10/5"
Flight Controller ( DJI Naza-M, KK2, AeroQuad )
Lipo batteries - 3 to 4 Cell
Lipo Charger and safe pack
Radio System (2.4Ghz with at least 6 channels)
Camera Gimbal - loads to choose from but the Tarot Hero3 Gimbal seems like a clear winner for $$

First off is the kit, I chose the DJI Flamewheel F450.. very similar to the ready built phantom but with the ability to customize and upgrade. The frame kit was $220 AUD and included the motors, esc's, 2 sets of propellers, wire and a few other extra's.

The main build part is the base plate where the esc's and power wires are soldered onto the bottom board. Take your time!! check your + and -, also once completed and checked with a multimeter cover the joints with hot glue blobs.. this will protect them from moisture in the air.

The next steps are to install the electrontics such as flight controller, reciever & motors. I chose the DJI Naza-M with GPS for my flight controller... not the cheapest option out there but was worth the $$.. I picked up a version 1 for $260 USD as they are being phased out for a version 2.
For more info check out http://www.dji.com/product/naza-m-v2/

The stock 920Kv motors have a surprisingly big punch for such a small motor!
For radio gear I went with the Futaba T8J as it was not only cheaper but has an amazing system called S-Bus.. basically a digital signal to the Naza-M not an analogue send.. this is not only more accurate but you will only need to connect one cable to control everything!! I have been warned against Spektrum for quad use as it can cause issues and "fly aways!"

First motor startup
After this check your pretty much ready to fly! do a few flights without any camera or extra fpv gear attached.. if there is an issue and the quad goes down its better that nothing expensive gets damaged.

Here is my first flight!
After at least a few flights of practice its now time to start adding things, My weapon of choice was the Tarot GoPro Brushless Gimbal and some Tarot carbon fiber land legs.
An awesome page for info on the gimbal is here RC Groups - Tarot GoPro Gimbal FAQ
They can be picked up from HobbyKing for aprox $150
My testing of the gimbal after building
Some more information how I placed the battery, receiver, gimbal, legs, GPS ect...
And finally some results!!
To achieve these results for just over $1,000 is amazing and the best part is almost anyone could do this!! its also fairly easy to fly with GPS
More to come and thanks for reading
Friday 2 August 2013
THE WOLVERINE

Myself and the amazing crew at Rising Sun Pictures have been working on the latest Wolverine movie and its been receiving some great reviews! Without going into too much detail here there is an incredible breakdown video on the RSP website to check out all the amazing effects work undertaken.
There is also some amazing write ups on FX Guide and CG Society to check out


From Logan's claws, poison ninja arrows and atomic explosions.. I think its safe to say we rocked it!
Check out the international trailer here
Subscribe to:
Posts (Atom)